![]()
97.9 The Hill and Chapelboro.com have partnered with Orange County Master Gardeners for “Playing in the Dirt,” a monthly column exploring the fertile ground of home gardening in our community and intended to provide the information and inspiration gardeners of all skills levels need to flourish! Check back on Chapelboro each month for a new subject – from our gardens to yours!
By Mary Arnold, Orange County Master Gardener volunteer
Planting in straw bales is an easy way to grow vegetables. There’s no digging, stooping or weeding! Straw bales make good use of limited space and sunlight. They also avoid diseases and pests, such as root-knot nematodes, that may be in the ground.
In a recent talk at the Orange County Library, Hillsborough residents Julee and Ames Herbert explained how to garden with wheat straw bales. Their presentation was part of the Dig Deeper series of talks at the library sponsored by the Orange County Master Gardener volunteers. (Julee Herbert is a Master Gardener volunteer.)
Here are their tips for growing beautiful vegetables and flowers in wheat straw bales:
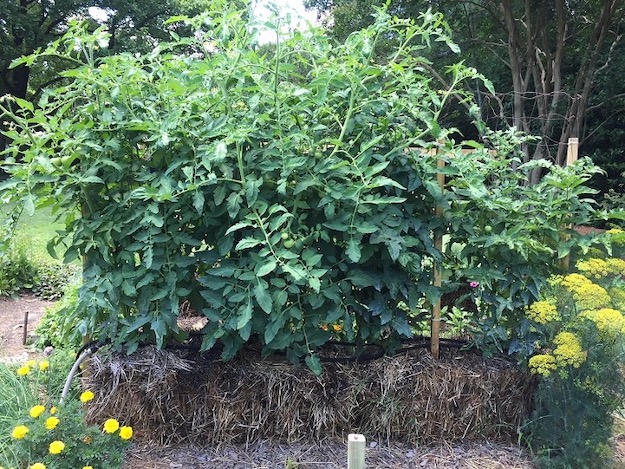
Tomatoes growing in a wheat straw bale.
Step 1: Find a spot on your property that’s suitable for straw bale gardening. For the best results, you need:
- Six to eight hours of direct sunlight each day.
- Access to an outdoor faucet. Straw bales dry out quickly so they need to be watered frequently.
- If possible, orient the bales (end-to-end) from north to south so that plants get even sunlight throughout the day. This will help them grow straighter so they won’t need as much support.
It’s important to provide sturdy support structures for tomatoes and other large plants. Wind from summer storms can blow down plants if they are not well-supported. You can use wooden or metal posts, fencing materials or tomato cages.
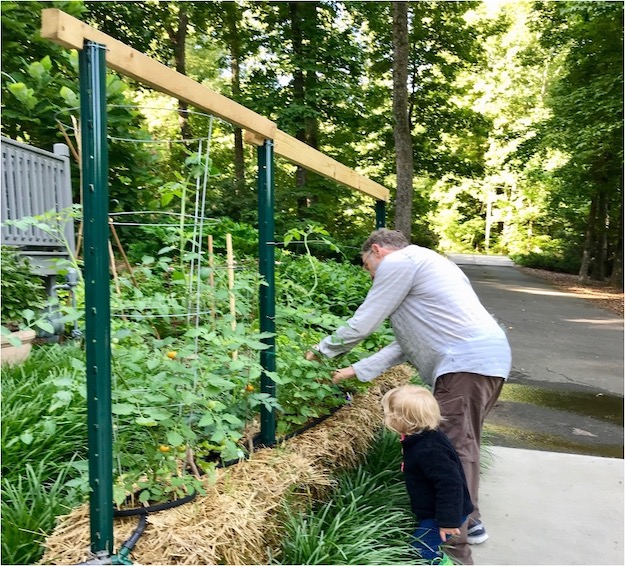
Ames Herbert and his granddaughter check on vegetables growing in a wheat straw bale.
Step 2: Calculate how many bales and plants will fit in your garden space. A wheat straw bale measures about 18” x 36” x 14”. You can cluster bales or line them up in rows (north-to-south if possible). When placing bales, consider how plants will spread. For example, squash plants need room for the vines to grow.
Step 3: How many plants should you put in each bale? Don’t overplant. Crowded plants will not grow as well or yield as much fruit. One bale will grow one to two tomato plants, four to six lettuces, four to six cucumber plants, three to four strawberry plants, two to three zucchini or summer squash, four peppers or two to three eggplants.
Some gardeners plant a few herbs or flowers into the sides of bales in addition to the vegetables planted on top.
Step 4: Hurry to a garden center and buy your bales! Even though you can’t start your wheat straw bale gardening until the weather warms up, buy your bales now. Stores are selling last year’s bales and stockpiles may run out temporarily until the next wheat harvest in July. Typically, the cost is $6 to $7 per bale.
Tips for picking the best bales:
- Ask your garden center for wheat straw bales produced in North Carolina to avoid an herbicide that can be used on wheat crops in other states.
- Only purchase wheat straw bales. Do not buy hay bales, which are intended for livestock feed and will be full of seeds.
- Look for a tight bale — one with long straw pieces. If you can’t easily pull any straw out of the top, it’s an ideal bale. The top of the bale is the side where cut straw ends are sticking up.
Step 5: Buy two kinds of fertilizer and get ready to condition your bales when warm weather arrives. Why do bales require “conditioning”? Conditioning jump-starts the straw composting process that will feed your plants. The science of this is that the fertilizer you apply to the bale feeds bacteria that start composting the bale. Once the bale composting process gets started, bacteria and other organisms will release the nutrients that will nourish your plants.
You can use either traditional fertilizer or an organic fertilizer such as feather meal or blood meal. The fertilizer should be instant release, not slow release.
You’ll need:
- A small bag of fertilizer that is high in nitrogen and low in potassium and phosphorus — such as a 30-0-4 (Nitrogen-Phosphorus-Potassium) mix. You will need just 2 1/4 cups of inorganic fertilizer per bale (or 13 1/2 cups of organic). It can be lawn fertilizer, as long as there is no weed killer (herbicide) in the product. Note that fertilizer with higher concentrations of phosphorus and potassium, like an 8-8-8 or 10-10-10, may be toxic to the bacteria you are trying to nurture during the early part of the conditioning process, so don’t use that for conditioning on Days 1-9.
- A small bag of balanced 10-10-10 fertilizer — with equal parts nitrogen, phosphorus, and potassium. You will use this type of fertilizer at the very end of the bale conditioning process.
Step 6: Start conditioning your bales after warm weather arrives and two to three weeks before planting. The bacteria feeding on your fertilizer are living organisms that need reliably warm weather to thrive, so wait until spring to start conditioning your bales.
Follow this conditioning schedule:
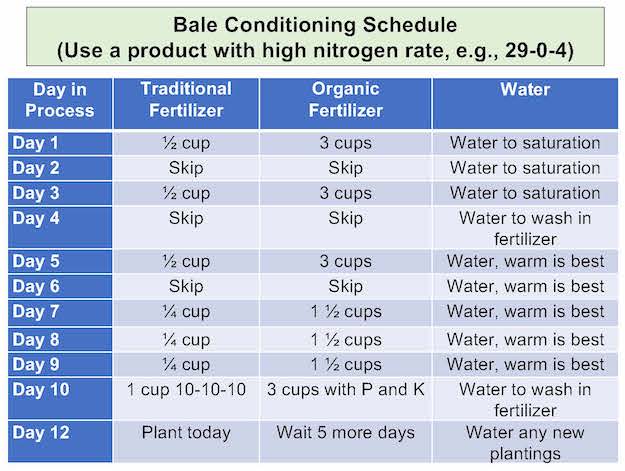
When you start conditioning:
- Make sure that your bales are placed on the ground or pavement with the top side up. The cut ends of the straw should be visible on top of the bale. You need capillary action working for you, to draw the fertilizer and water through the open, cut ends of the straw and down into the interior of the bale.
- Day by day, sprinkle the bale with the type and amount of fertilizer specified in the conditioning schedule. Then water with force, close to the bale, until water drips out the bottom.
- You will know that your bale is conditioned and ready to plant when you can easily pull some straws out of the top, and the interior temperature is slightly warm to the touch, but not uncomfortably hot. If you use a compost thermometer, it should read 99 degrees Fahrenheit or below before you plant in your bale. The temperature of your bale is only an issue before you plant, not afterwards.
- If you use organic fertilizer, it may take an extra five to seven days to condition your bale.


Step 7: Time to plant! You can plant seedlings or seeds in your bale. It’s your choice.
For seeds: Spread a 2-inch layer of potting soil on top of the bale. Plant seeds at the depth recommended on the seed package. Water thoroughly and keep the seeds moist until they sprout. Thin plants as needed to avoid overplanting your bale.
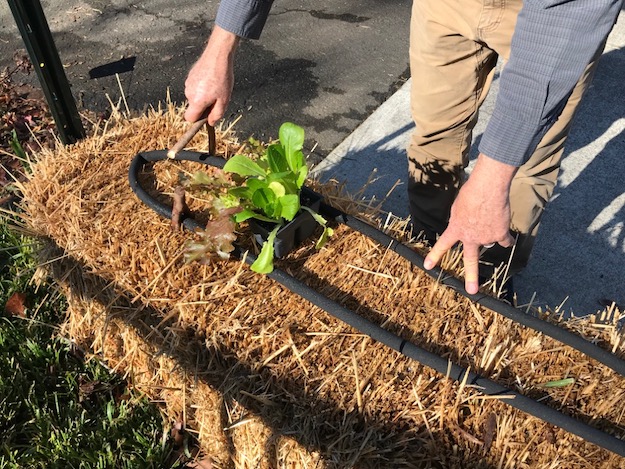
For seedlings: Remove enough straw in the top of the bale to make planter-pot-sized holes that are 4 inches in diameter. You can use a serrated garden knife and a trowel. Line holes with potting soil to protect bare roots. Stabilize seedlings with additional potting soil, and then water.
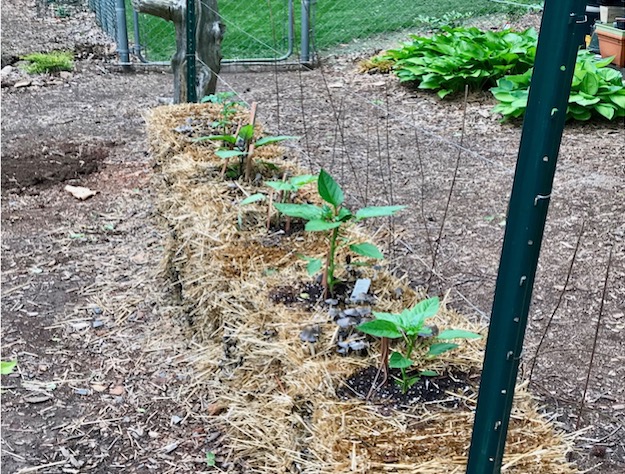
This is how your planted bales should look. Note that plant supports already are in place.
Tips for growing healthy plants:
- Monitor plants often.
- Add more plant supports as needed.
- Lightly top-dress plants with a balanced (N-P-K) fertilizer. You also could use an organic fertilizer, compost tea or fish emulsion.
- Seeing ink cap mushrooms is a good sign that decomposition has started!
- Water frequently.
A 25-foot drip hose can be used to water multiple bales at once. This eliminates hand-watering. The drip hose is serpentined and can be secured to the tops of bales with metal lawn staples or, as in this photo, forked sapling branches.
By the end of the growing season, the cycle is complete. Your wheat straw bale garden will be transformed into mulch and compost that you can use to enrich your soil and top-dress plantings in your yard, or for next year’s garden. One caution: If you planted tomatoes and they became diseased, don’t use that mulch/compost on future tomato beds.
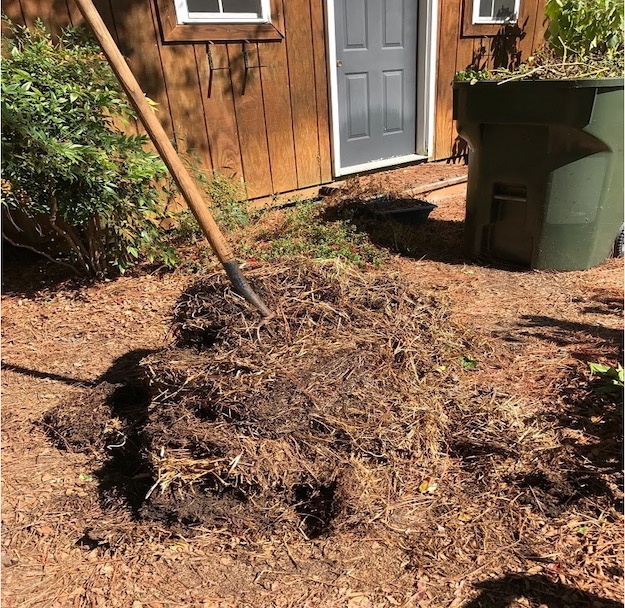
Used straw bales can be used as mulch or compost.
(Mary Arnold wrote this article based on Julee and Ames Herbert’s Feb. 18 presentation at a Dig Deeper talk at the Orange County Library. The Dig Deeper talks are sponsored by the Orange County Master Gardener volunteers. All photos courtesy of Julee and Ames Herbert.)
Additional Resources:
- Straw Bale Gardens – Complete. Joel Karsten. Cool Springs Press, Minneapolis, MN, 2015.
- Growing Vegetables in Straw Bales. Craig LeHoullier. Storey Publishing, North Adams, MA, 2015.
- Straw Bale Gardening Factsheet – HGIC 1264. LayLa Burgess, Clemson University Cooperative Extension, 2017.
- Planting in Your Straw Bale Garden. (Video) Straw Bale Garden Club.
Check us out!
Have a plant or garden question? Email the Orange County Master Gardener volunteers at ocmgardeners@gmail.com or phone 919-245-2061.
Subscribe to The Garden Buzz, the Orange County Master Gardeners’ monthly newsletter, for gardening news and tips. And visit our website, The Orange Gardener.
Chapelboro.com does not charge subscription fees, and you can directly support our efforts in local journalism here. Want more of what you see on Chapelboro? Let us bring free local news and community information to you by signing up for our biweekly newsletter.
