![]()
97.9 The Hill and Chapelboro.com have partnered with Orange County Master Gardeners for “Playing in the Dirt,” a monthly column exploring the fertile ground of home gardening in our community and intended to provide the information and inspiration gardeners of all skills levels need to flourish! Check back on Chapelboro each month for a new subject – from our gardens to yours!
By Mary Leonhardi and Mary Arnold, Orange County Master Gardener volunteers
It’s not too early to start plants from seed, using an easy method that germinates the seeds in miniature “greenhouses” that are placed outdoors. This article will explain how you can make greenhouses out of translucent plastic gallon milk jugs. The milk jugs offer a controlled environment and protect the seedlings from freezing temperatures. This germination method allows the natural conditions of your local climate to start the growth process. Making these greenhouses is a great family and inter-generational activity.
Using this step-by-step method, you can cost-efficiently produce an abundance of hardy – and hardened off – plants from seed for your spring and summer gardens. Keep in mind that your work at any step of the process doesn’t have to be perfect. The seeds want to grow and Mother Nature knows what to do.

Plants growing in jug “greenhouses” after being started from seed. Photo by Mary Leonhardi.
You can start seeds anytime after the Winter Solstice in December, except for warm-season vegetables, which should be started in late February or early March.
Step 1: Buy your herb, flower and vegetable seeds. The following seeds are suitable for winter sowing:
- Herbs: Borage*, chamomile*, chervil, chives, cilantro/coriander, dill*, fennel, lavender, lemon balm, lovage, mint, oregano, rosemary, rue, sage, summer savory, sweet marjoram, tarragon, thyme. (*Borage, chamomile and dill are self-seeding annuals.)
- Flowers: Perennials; flowers that self-sow; flower seeds that require stratification (exposure to cold temperatures outdoors), refrigeration or prechilling; flowers that can be sown outdoors in early spring or late fall while frosts can occur; natives, wildflowers. (From: “What is winter sowing? A simple guide to jump-start your seed planting,” backyardgardenlover.com)
- Vegetables: Alliums, arugula, Asian greens, beans*, beets**, brassicas (such as cabbage, kale, broccoli and collards), carrots**, celery/celeriac (a type of celery grown for its root), chard, corn*, cucurbits* (such as cucumbers, melons, squash), lettuce, parsnips, peas**, radish**. (*Beans, corn and cucurbits are warm-season veggies. **Beets, carrots, peas and radishes are often direct-sown in the garden.)
Step 2: Assemble your equipment and supplies and complete your prep. You will need translucent plastic milk or water jugs that will let in light. You also will need 3 to 4 inches of seed germination soil (no fertilizer) in each jug. Bags of seed starting mix are available at garden centers.
How many jugs will you need? Consider how many plants you want from your seed. Follow the directions on the seed package for depth and spacing of seeds.
You can plant a few extra seeds in each jug, but don’t crowd the seeds.
The photo below shows useful tools and supplies. They include an electric drill, box cutter, blue painter’s tape, plant labels, and a trigger sprayer and plastic tub for watering from above and below.


Step 3. Drill or cut holes in the bottom of the milk jug for drainage. The drilling method shown below uses a spackle bucket and second milk jug to brace a jug as you drill.
Step 4. Remove and dispose of the jug cap. The tops of your greenhouses need to be open, so no cap is required. Cut jugs in half, leaving a small (1/2 inch to 1 inch) section intact as a hinge. Pro tip: Complete Steps 1 to 4 to prep all of your jugs before you begin planting.


Step 5. Fill container with seed starting soil mix (no fertilizer) at least 3 to 4 inches deep.
Step 6. Place jugs in a tub with water to moisten soil from the bottom. Let the water drain out the bottom holes thoroughly before planting seeds so the soil is not too wet, or the seeds can mold.
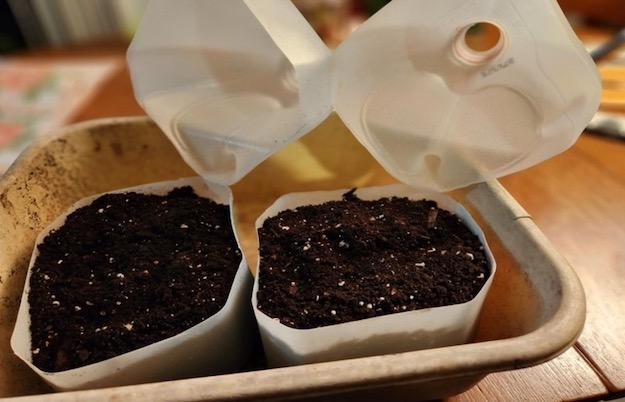
Put jugs in a tub of water to moisten soil. Photo by Mary Leonhardi.
Step 7. Place seeds on top of soil.
Step 8. Cover with soil the depth of the seed size.
Step 9. Moisten (lightly spray) soil from top with the trigger sprayer.
Step 10. Insert a label with the name of the plant and date.
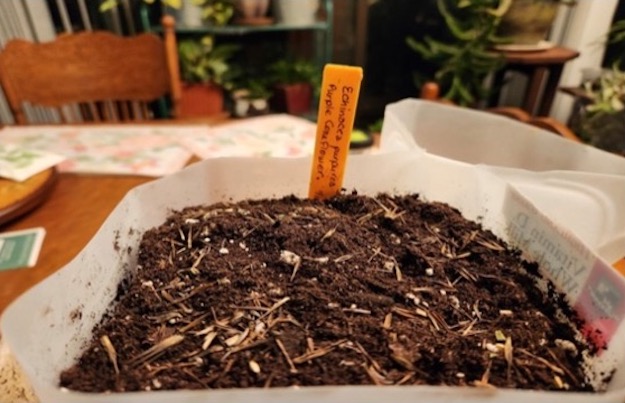
Label each jug with the name of the plant and the date seeds were started. Photo by Mary Leonhardi.
Step 11. Tape the container shut with blue painter’s tape. Then be patient. Don’t open the jug again for any reason until after the seeds germinate.
Step 12. Label the outside of the container with the plant name or number and date.
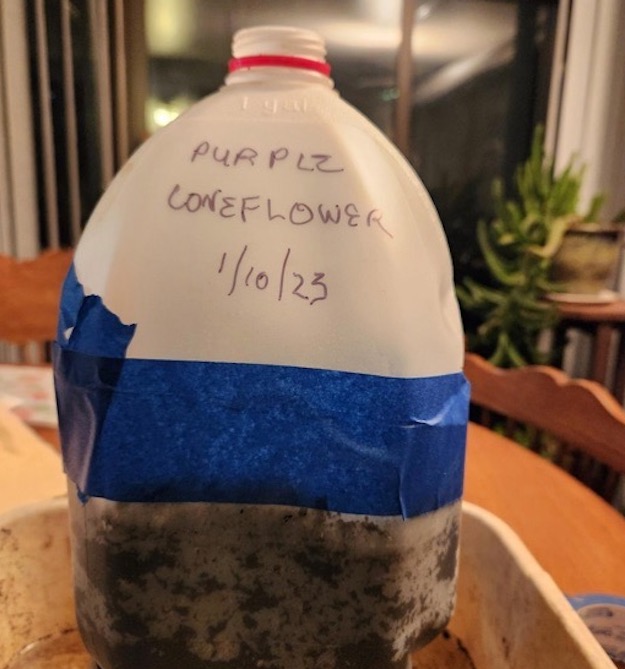
Tape the jug together and label the jug with the plant name and the date seeds were started. Photo by Mary Leonhardi.
Step 13. Place jugs outside on the ground, in the sun, in a row or two, in a spot where they will experience the elements.
Step 14. Check your jugs for moisture. If there is condensation on the inside of the jug, there’s enough moisture. If dry, water around the inside of the top of the unopened jug with the trigger sprayer, which will drip down onto the soil and seeds.
Step 15. Check your jugs for germination and keep them organized by sorting them into two groups: germinated and not germinated.
Step 16. If the temperature is in the low 20s (or colder) at night, use a tarp or blanket to cover the jugs where seeds have germinated. The seed coat will protect seeds that have not germinated, so those jugs don’t need to be covered.
Step 17. Once seed has germinated and has grown a second set of leaves, it is ready to plant in the ground or in pots.
Pro tips:
- It’s easier to transplant seedlings with tangled roots if you repot into a large pot first and then separate the root masses once the plants get bigger.
- A fork is a great transplanting tool.
- Natives generally have quicker, deeper, more vigorous root growth and need to be transplanted earlier.
The same jugs can be used for two years before the plastic starts to break down. Wash jugs with soap and water at the end of the first season. Don’t let your jugs sit without washing or they become more difficult to clean. When clean jugs are dry, store them in large plastic bags or otherwise protect them from getting dirty so you don’t have to wash them again the next winter.
To give you an idea of the results you can expect, this photo shows the yield from 100 jug greenhouses that have grown from winter sowing to spring planting!
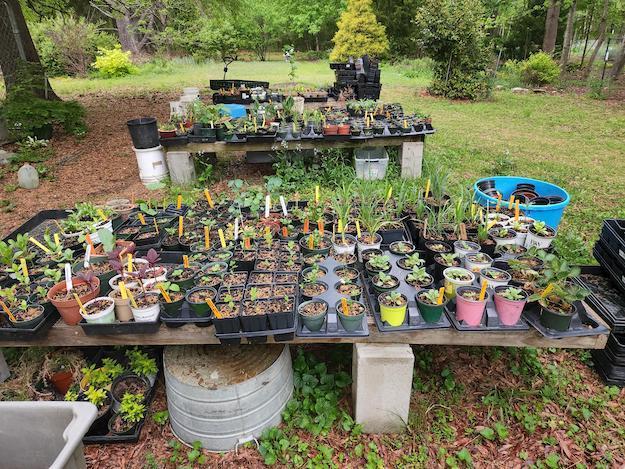
Plants growing in pots and flats after being transplanted from jugs. Photo by Mary Leonhardi.
(Thanks to Mary Arnold, an Orange County Master Gardener volunteer, who wrote this article based on the content of a recent presentation by Mary Leonhardi.)
Want to know more?
- Starting Seeds in Winter. Penn State Extension.
- Vegetable Gardening: A Beginner’s Guide. NC State Cooperative Extension.
- Central North Carolina Planting Calendar for Annual Vegetables, Fruits and Herbs. NC State Cooperative Extension.
Check us out!
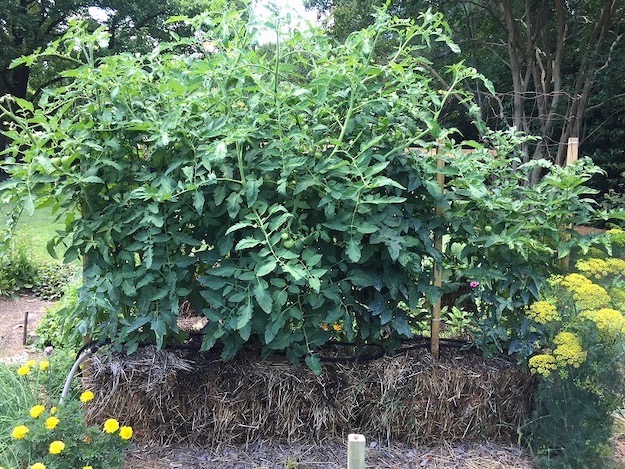
Tomatoes growing in straw bales. Photo by Julee Herbert.
Learn about straw bale gardening, an easy and efficient way to grow vegetables above ground, at our next Dig Deeper talk, Feb. 18 at 2 p.m. at the Orange County Library. Pick up free seed packets from our Community Seed Library team! More information here.
Have a plant or garden question? Email the Orange County Master Gardener Volunteers at ocmgardeners@gmail.com or phone 919-245-2061.
Subscribe to The Garden Buzz, the Orange County Master Gardeners’ monthly newsletter, for gardening news and tips. And visit our website, The Orange Gardener.
Chapelboro.com does not charge subscription fees, and you can directly support our efforts in local journalism here. Want more of what you see on Chapelboro? Let us bring free local news and community information to you by signing up for our biweekly newsletter.
